HVAC Disassembly and Cleaning
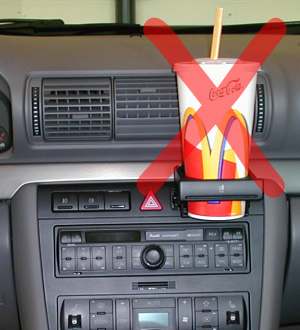
The design of the cup holder on the 1999½ Audi A4 (and other years/models) has a rather problematic side effect. If and when (and it will happen) a drink spills, it drips all over your radio and HVAC causing the keys to being sluggish and sometimes stick. While in +20°C weather the key will probably return fairly quickly, at -35°C your lucky if the key returns at all.
Something needed to be done:
This procedure will deal with the HVAC unit itself. The radio (Concert) is much easier to disassemble and won't be covered here.
Dealer replacement value of the unit (8D0 820 043N B98) is over 800 $CDN (500 $US). Treat it with care. You've got better things to spend that money on if you happen to damage it. That being said, I take no responsibility of your actions in removing and opening your unit. These were the steps I did in order to back out of Audi's design oversight. My vehicle is still under warranty, I probably should have got it replaced at Audi's expense. However, I don't feel to comfortable with my dealer ripping apart my center console.
Your unit may differ, but I suspect the same technique will still apply.
jonese@zener.comUNIT REMOVAL HINTS
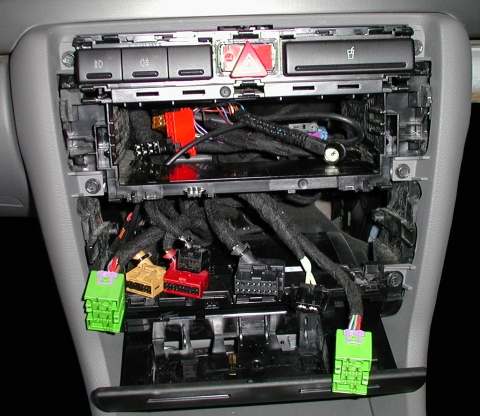 Here
is the center console with the radio
and HVAC unit removed.
How you get to this step will probably be the most unprofessional work you'll
ever perform on your car. I have no idea what Audi was thinking when they
decided on the mounting method for the unit (or I'm missing something here?).
Here
is the center console with the radio
and HVAC unit removed.
How you get to this step will probably be the most unprofessional work you'll
ever perform on your car. I have no idea what Audi was thinking when they
decided on the mounting method for the unit (or I'm missing something here?).
The radio was a breeze. Make sure you know it's unique
security code before removing it. The difficult part is getting the
proper key removal tools. If your Audi/VW dealer is reasonable, they may
be willing to release the radio for you if you take a visit to them. Once
you've got the radio released from it's mounting clips, it's a simple matter of
pulling it out.
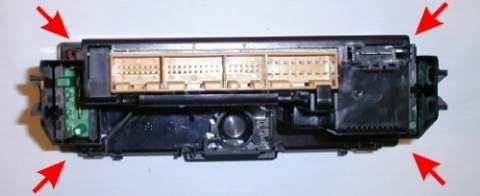
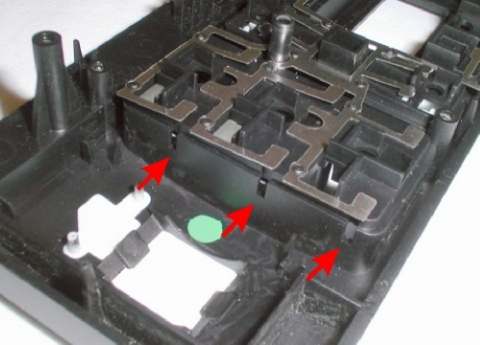
The HVAC unit is held in place with FOUR angle brackets that clip into place
when it was initially installed at the factory. These are troublesome to
release. The top pair are easy to release with a small screwdriver.
You can pull them slightly forward from their normal position so they no longer
catch the surrounding plastic. The bottom clips are about the same
distance apart, but are quite a bit further back along the bottom side. I wasn't able to see
them from the outside. I had to jamb two thick screwdrivers under the
unit distorting the plastic brace above the ash tray. The idea was to
push the brace away from the clips so you could pull the unit out without them
catching.
In stead of pulling, I found that putting your hand inside the radio opening and
pushing the unit out was easier. It's your choice, but there isn't much of
a grip on the front of the unit for you to pull on.
 During
your extraction, be
careful not to damage the bottom rubber bushings as you deal with the bottom
retainer-clips. These are for shock suppression and probably reduce the rattling of assemblies..
During
your extraction, be
careful not to damage the bottom rubber bushings as you deal with the bottom
retainer-clips. These are for shock suppression and probably reduce the rattling of assemblies..
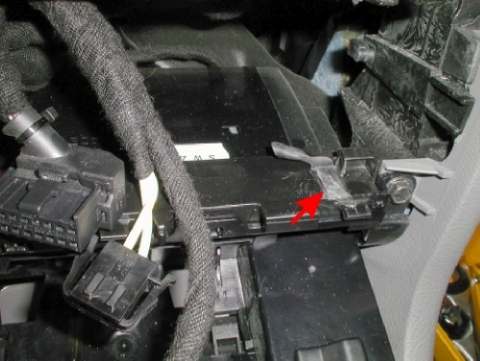
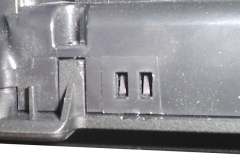
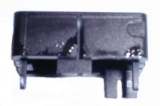
 This
is the dreaded bottom retainer-clip that holds the bottom of the unit in. Due to the difficulty in removing the unit with these clips
installed, I have
removed them before re-installing. This will make removal MUCH easier should you
need to remove it again in the future. I have no idea as to what impact this
will have on holding the unit flush with the center instrument trim. Everything seems
fine at the moment.
This
is the dreaded bottom retainer-clip that holds the bottom of the unit in. Due to the difficulty in removing the unit with these clips
installed, I have
removed them before re-installing. This will make removal MUCH easier should you
need to remove it again in the future. I have no idea as to what impact this
will have on holding the unit flush with the center instrument trim. Everything seems
fine at the moment.
TOOLS
![]() Nothing
really special except for a really-really small Torx screwdriver. My Torx
set didn't go small enough. I found that one of my jeweler's flathead
screwdriver's fit just in side the Torx head without slipping.
Nothing
really special except for a really-really small Torx screwdriver. My Torx
set didn't go small enough. I found that one of my jeweler's flathead
screwdriver's fit just in side the Torx head without slipping.
DISPLAY-HEAD SEPARATION
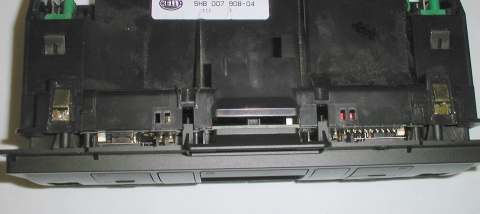
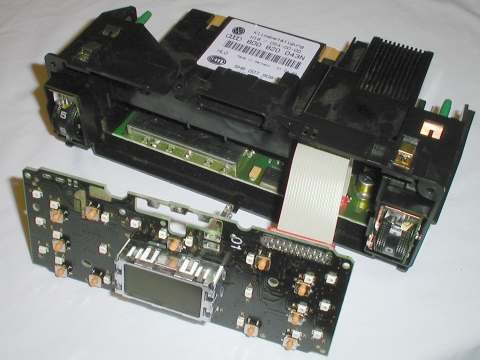
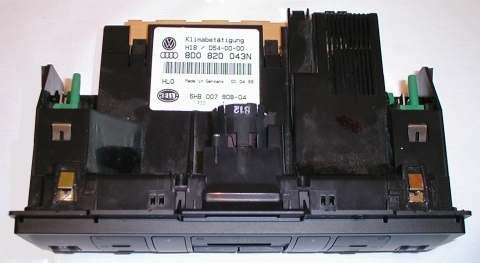 Here's
the unit removed from the center console.
Here's
the unit removed from the center console.
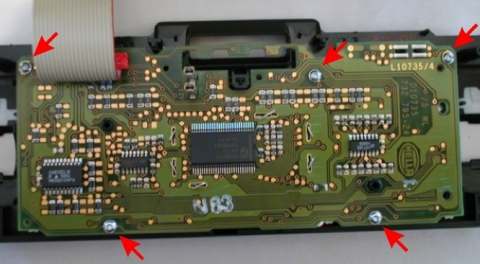
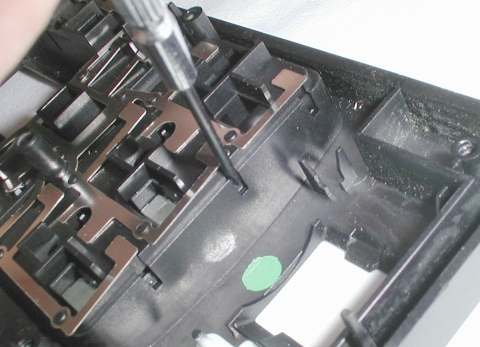
 Set
the unit face down on some soft clean surface being careful not to scratch the
face. You'll
need to remove the FOUR screws on the backside of the assembly (Torx head).
These are relatively short and easy to remove.
Set
the unit face down on some soft clean surface being careful not to scratch the
face. You'll
need to remove the FOUR screws on the backside of the assembly (Torx head).
These are relatively short and easy to remove.
 You may
choose to remove the temperature blower (Torx head), but on this style of unit
it wasn't necessary. Your unit may differ. I removed the TWO screws and
pulled up. The contacts for the motor just slide out like a connector.
You may
choose to remove the temperature blower (Torx head), but on this style of unit
it wasn't necessary. Your unit may differ. I removed the TWO screws and
pulled up. The contacts for the motor just slide out like a connector.
 At
this point, the display-head will be lose, but still inseparable. There are TWO hooks
on the top, near where the temperature blower is that
need to be slightly depressed.
At
this point, the display-head will be lose, but still inseparable. There are TWO hooks
on the top, near where the temperature blower is that
need to be slightly depressed.
 Slip
the end of the jeweler's screwdriver tip between the display-head and the unit-body.
Gently lift the unit-body plastic up over the display-head. Go easy! If you look
closely, you can see dents from my initial attempts. You'll
now have the display-head section separated from the unit-body by way of a
ribbon cable. ESD precautions.
Slip
the end of the jeweler's screwdriver tip between the display-head and the unit-body.
Gently lift the unit-body plastic up over the display-head. Go easy! If you look
closely, you can see dents from my initial attempts. You'll
now have the display-head section separated from the unit-body by way of a
ribbon cable. ESD precautions.
You now have exposed a good portion of the unit electronics. This is static sensitive device. Handle as little of the electronic components as possible. Don't be walking around your house with the unit open to show all your friends how cool it looks inside. Even the tiniest of electrostatic discharge can destroy the unit. If you live in a low humidity area, you might also want to think about grounding your self.
 Carefully
place the display-head face down. Remove the FIVE screws that hold the
faceplate to the display board.
Carefully
place the display-head face down. Remove the FIVE screws that hold the
faceplate to the display board.
 Set
aside the electronics portion for later reassembly. You might want to make
sure the LCD display is clean. Don't use any chemicals that may damage the
glass.
Set
aside the electronics portion for later reassembly. You might want to make
sure the LCD display is clean. Don't use any chemicals that may damage the
glass.
KEY REMOVAL
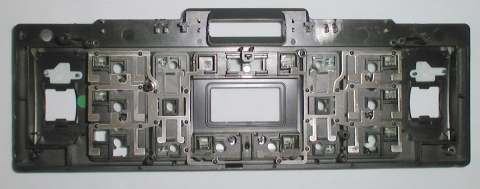 Place
the keypad assembly face down. You'll notice that the keys get some of their
bounce from the metal frame that floats around the backside of the keys.
One must be careful not to stress and damage the frame
when removing keys.
Place
the keypad assembly face down. You'll notice that the keys get some of their
bounce from the metal frame that floats around the backside of the keys.
One must be careful not to stress and damage the frame
when removing keys.
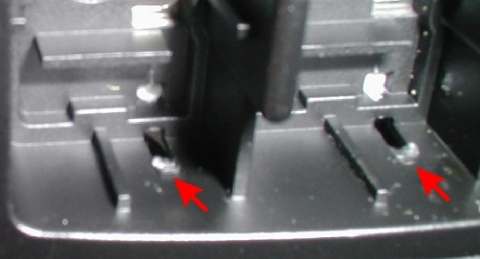
 Locate
the slider-holes for each of the keys that you wish to remove. Each key has at
least TWO holes that guide the key. The holes also function to
limit the keys travel (to retain the key in the cavity). In the
factory, these keys are pushed in from the front past the point of the interference
inside the slider-holes.
You're going to have to reverse that process in order to remove the key. It's not easy! The
assembly wasn't designed with key removal in mind.
Locate
the slider-holes for each of the keys that you wish to remove. Each key has at
least TWO holes that guide the key. The holes also function to
limit the keys travel (to retain the key in the cavity). In the
factory, these keys are pushed in from the front past the point of the interference
inside the slider-holes.
You're going to have to reverse that process in order to remove the key. It's not easy! The
assembly wasn't designed with key removal in mind.
 To
remove a key, you need to push the key past it's interference point. Do one side
of the key,
then the other. Great care must be taken NOT to damage
the cavity glide paths and key latches or the key will no longer travel smoothly
or 'pops- out' when you take your finger off. TAKE YOUR TIME!. If a
key isn't releasing, find out why. It takes a bit of pressure, but not a whole
lot. After 2 or 3 keys, you should get a good feel as a technique.
To
remove a key, you need to push the key past it's interference point. Do one side
of the key,
then the other. Great care must be taken NOT to damage
the cavity glide paths and key latches or the key will no longer travel smoothly
or 'pops- out' when you take your finger off. TAKE YOUR TIME!. If a
key isn't releasing, find out why. It takes a bit of pressure, but not a whole
lot. After 2 or 3 keys, you should get a good feel as a technique.
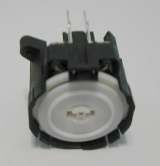
The two rocker keys (TEMPERATURE & FAN SPEED) can be easily removed by pressing
down simultaneously on the studs located on the back of the key. (The studs are
the plastic portion that are in contact the switches on the display board).
 Once
again, be
careful not to damage the guides. Here you can see some minor damage I had. You
should clean out any plastic bits that were created when the key popped out. Don't get too
carried away or you'll risk the key not holding when you reassembly everything.
Once
again, be
careful not to damage the guides. Here you can see some minor damage I had. You
should clean out any plastic bits that were created when the key popped out. Don't get too
carried away or you'll risk the key not holding when you reassembly everything.
CLEANING
 Now
you have all the necessary keys removed from their respective cavities (take
note before you start as to which keys are sticky!). Examine each key and
cavity for the source of the problem. Dirt and fluid reside are prime
candidates.
Now
you have all the necessary keys removed from their respective cavities (take
note before you start as to which keys are sticky!). Examine each key and
cavity for the source of the problem. Dirt and fluid reside are prime
candidates.
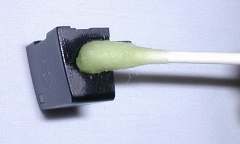
 Notice
the shinny "goop". This is causing the keys to stick to the keypad assembly.
Yours may look different, but this is what Coke leaves behind on my keys.
Notice
the shinny "goop". This is causing the keys to stick to the keypad assembly.
Yours may look different, but this is what Coke leaves behind on my keys.
 Clean
the keys with a suitable cleaner. I used Simple Green. Don't use anything
too strong (like rubbing alcohol), or you'll damage the plastic. I also washed
the parts under warm soapy water to remove any residue. Make sure all the parts
are free of water or rust will develop on the metal spring frame.
Clean
the keys with a suitable cleaner. I used Simple Green. Don't use anything
too strong (like rubbing alcohol), or you'll damage the plastic. I also washed
the parts under warm soapy water to remove any residue. Make sure all the parts
are free of water or rust will develop on the metal spring frame.
REASSEMBLY
Reassembly is just the reversal of the above steps. Take your time, double check to put the keys back in the correct cavities. Make sure you're orienting the keys correctly (e.g.. No up-side-down TEMPERATURE or FAN SPEED keys!). Double check that each key sits smartly into each cavity without binding. If the key tends to pop out, you may have damaged the cavity guides or hooks during the removal process. I didn't run into this, but you can try fiddling with the plastic guides or hooks to bring them out a little so there is a interference fit.
When your all done, sit back and admire the crisp clean "click" when you press the buttons.
jonese@zener.com
Good luck!
Last updated: 2002/08/08 21:11